Pipe Insulation Roller Coaster Assessment

Welcome back. If you haven't joined us for the last two posts, let me recommend that you first read about determining rolling friction on the coaster and the project overview.

On to the assessment...

Assessment is extremely important. It explicitly informs students what things we value (and thus the things we value). If we assess the wrong things, students will focus on the wrong things. This can turn an otherwise excellent project into a mediocre project. For this post, I'll share two methods of assessment: First, the "old" method I used when I last taught physics (in 2008). Second, my updated assessment scheme that I'd use if I did this project again.

The old assessment strategy

Embedded below is the document I gave to students at the beginning of the pipe insulation roller coaster project. Most noticeably it includes a description of the assessment scheme I used way back in January of 2008.
[scribd id=73149530 key=key-2h4y3du7bm3b9wfvgt2g mode=list]


As you can see, I split the assessment of this project into two equal parts:

An assessment of the finished roller coaster

I wanted students to think carefully about the design, construction, and "marketing" of their coasters. I wanted them to design coasters that not only met the requirements, but coasters that were beautiful and interesting. Individual items being assessed under this rubric were weighted differently. For example, "Appropriate name of the coaster" was only worth 5%, while "Creativity, originality, and aesthetics" was worth 20%. Here's a link to the sheet I used when assessing this aspect of the coaster project.

An assessment of the physics concepts

In the embedded document above, you can see the breakdown of what items were being assessed. In my last post on pipe insulation roller coasters, you can see how students labeled their coasters with information on the marble's energy, velocity, and such along the track. Groups were required to turn in a sheet with the calculations they performed to arrive at these numbers. These sheets were the primary basis for determining whether students understood the physics concepts.

Problems

There are a lot of problems with the assessment scheme as described above. I'm not going to try to address them all, so here are a couple of the biggest issues:

  • Assessing coaster design
    • I'm a fan of elegant design. For this project I'm a fan of finished coasters that look well designed and exciting. That's why I included the first part of the assessment. I wanted to incentivize students to think about the design and construction of their coasters. In retrospect this is probably unnecessary. Students generally came into this project with plenty of intrinsic motivation to make their coaster the best in the history of the class. While I'd still stress the importance of quality design in the future, I'd completely cut this half of the assessment. Students already cared about the design of their coaster. If anything, awarding points for coaster design had an net negative effect. Especially because it doesn't assess anything related to the understanding of physics.
  • Assessing student understanding of physics concepts
    • As a normal part of working in a group while attempting to complete a large project in a limited time, students split up the work. Students are generally pretty smart about this in their own way. While I stressed that everyone in the group should contribute equally towards the calculations. Most groups would have the student who had the best understanding of the physics do most of the calculations. Why? Because it was faster. They needed to finish their coaster and just having the fastest person do the calculations meant more time for construction. While I generally knew when students in a group were adding very little to the calculations (and would assess them accordingly), on the whole this method didn't give me a good picture of each individual students' level of understanding. There were certainly students who skated through the project while minimally demonstrating their understanding of the energy and friction concepts involved.

The new assessment strategy

You've probably already picked up on a few of the improvements I'd make for this project.

  1. Use standards-based assessment. Standards-based assessment is an integral part of the classroom throughout the year- not just for projects. If you're unfamiliar with what this "standards-based" business is all about click the little number at the end of this sentence for plenty of links in the footnotes1. Here are a list of standards that would be assessed through this project:

    Content standards assessed

    • Energy
      • Understand and apply the law of conservation of energy.
      • Explain and calculate the kinetic energy and potential energy of an object.
      • Explain and calculate the amount of work done on and by an object.
      • Solve basic conservation of energy problems involving kinetic energy and potential energy.
      • Solve conservation of energy problems involving work and thermal energy.
    • Circular Motion
      • Solve basic circular motion problems using formulas.
    • Habits of Mind
      • Collaborate and communicate with others to meet specific goals.
      • Handle and overcome hurdles creatively and productively.

    The specific standards used can vary based on your specific implementation.

  2. No points for coaster requirements. As I mentioned earlier, it proved unnecessary to incentivize their coaster designs and meeting the basic requirements of the project. This decision also comes out of standards-based grading, which focuses assessment around, "Do you know physics?" instead of "Can you jump through the right hoops?" That isn't to say we don't talk about what makes a coaster "exciting" or "aesthetically pleasing" or whatever. It just means a student needs to demonstrate their understanding of the physics to earn their grade.
  3. A focus on informal assessment. Rather than heavily relying on a sheet of calculations turned in at the end of the project (and probably done lopsidedly by one or two group members) to determine if the group understands the physics, I'd assess their understanding as I walked around the classroom discussing the coasters and their designs with the students as they work on them. Starting with questions like, "Why did you make that loop smaller?," or "Where are you having trouble staying within the requirements?" can be used to probe into student thinking and understanding. The final calculations would still be a part of the assessment, but no longer the single key piece of information in the assessment.

On the whole I was very happy with this project as I used it in the past. As I've learned and grown as a teacher I've found several ways I can tweak the old project to keep up with the type of student learning I want to support in my classroom. If you have other suggestions for improvement, I'd be happy to hear them.

As a bonus, here's a student produced video of the roller coaster project made for the daily announcements. The video was made by a student who wasn't in the physics class, so there's a little more emphasis on the destruction of the roller coasters at the end of the project than I'd like. Kids. What can ya do?
[vimeo http://vimeo.com/32422278 w=500]

  1. Here are posts I've written about my experience implementing standards-based assessment. I'm not an expert, so let me also direct you my bookmarks related to standards-based grading, and some resources written by a couple people who are more expert: Shawn Cornally and Frank Noschese (who offers blog posts, a shared google doc foler, and a collection of bookmarked links). There are certainly other great resources out there, but these are a great starting point. []

Pipe Insulation Roller Coasters

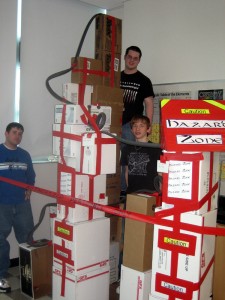
The Hazard Zone team with their coaster

I like projects. I really liked this project. The pipe insulation roller coaster project is one of the most enjoyable projects I've ever used in class.

History

It was my second year teaching physics. During the unit on energy, the book we were using frequently used roller coasters in their problems. We even had a little "roller coaster" to use with photo gates. I thought we could do better.

My original idea was to get some flexible Hot Wheels tracks and make some loop-de-loops and hills. Turns out a class set of Hot Wheels track is pretty expensive. On an unrelated yet serendipitous visit to my local big box hardware store, I ran across the perfect (and cheap!) substitute: Pipe Insulation!. For $1.30 or so you can get six feet of pipe insulation- which doubles nicely as a marble track1 when you split the pipe insulation into two equal halves. It's really easy to cut pipe insulation with a sharp pair of scissors. Just be sure you don't buy the "self-sealing" pipe insulation, which has glue pre-applied- it's more expensive and it'd turn into a sticky mess.

At first I planning to simply design a one-period long investigation using the pipe insulation (my original ideas morphed into the pre-activity for this project). As I started to think through the project more and more, I realized we could go way bigger. And thus, the pipe insulation roller coaster project was born.

Building the Coasters

In groups of three, students were given 24 feet of pipe insulation (4 pieces), a roll of duct tape2, and access to a large pile of cardboard boxes3. All groups had to adhere to a few standard requirements:

  • Construction requirements
    1. The entire roller coaster must fit within a 1.0m x 2.0m rectangle4.
    2. There must be at least two inversions (loops, corkscrews, etc.).
    3. All 24 feet of pipe insulation must be used.
    4. The track must end 50 cm above the ground.

    The coaster is under construction

  • Physics requirements
    In addition to meeting the above requirements, students were required to utilize their understanding of the work-energy theorem, circular motion, and friction to do the following:
    1. Determine the average rolling friction, kinetic energy, and potential energy at 8 locations on their roller coaster.
    2. Determine the minimum velocities required for the marble to stay on the track at the top of all the inversions
    3. Determine the g-forces the marble experiences through the inversions and at least five additional corners, hills, or valleys.
    4. The g-forces must be kept at "safe" levels5.
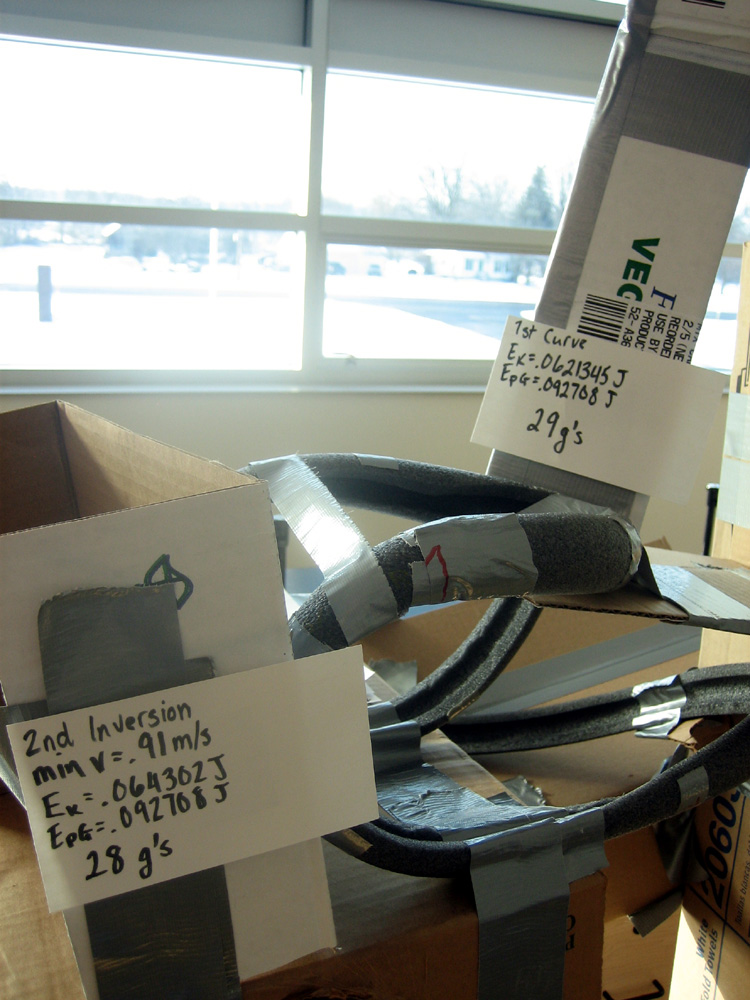
Labeling the Physics Data
The labels included information about the energy, velocity, and acceleration of the marble at specific points (Note: there are some sig fig issues here).
Calculations
  1. Rolling friction, kinetic energy, and potential energy
    • The potential energy ($latex U_g = mgh$) is easy enough to find after measuring the height of the track and finding the mass of the marble. The kinetic energy is trickier and can be done by filming the marble and doing some analysis with Tracker, but since the speed of the marble is likely to be a little too fast for most cameras to pick up clearly, it's probably easier (and much faster) to simply measure the time it takes the marble travel a certain length of track. I describe how this can be done in a previous post, so check that out for more info. That post also includes how to calculated the coefficient of friction by finding how much work was done on the marble due to friction- so I'll keep things shorter here by not re-explaining that process.
      • Pro-tip: Have students mark every 10 cm or so on their track before they start putting together their coasters (note the tape marks in this pic). Since d in $latex W=F\cdot d$ in this case is the length of track the marble has rolled so far, it makes finding the value for d much easier than trying to measure a twisting, looping roller coaster track.
    
    
  2. Minimum marble velocities through the inversions.
    • This is also called the critical velocity. That's fitting. If you're riding a roller coaster it's pretty critical that you make it around each loop. Also, you might be in critical condition if you don't. While falling to our death would be exciting, it also limits the ability to ride roller coasters in the future (and I like roller coasters). Since we're primarily concerned with what is happening to the marble at the top of the loop, here's a diagram of the vertical forces on the marble at the very top of the loop:

      The red curve is the roller coaster track. Just so you know.

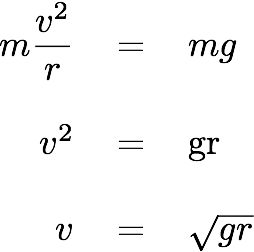
      So just normal force (the track pushing on the marble) and gravitational force (the earth pulling on the marble). Since these forces are both acting towards the center of the loop together they're equal to the radial force:

      When the marble is just barely making it around the loop (at the critical velocity), the normal force goes to zero. That is, the track stops pushing on the marble for just an instant at the top of the loop. If the normal force stays zero for any longer than that it means the marble is in free fall, and that's just not safe. So:

      Then when you substitute in masses and accelerations for the forces and do some rearranging:

      There you go. All you need to know is the radius of the loop, and that's easy enough to measure. Of course, you'd want a little cushion above the critical velocity, especially because we're ignoring the friction that is constantly slowing down the marble as it makes its way down the track.

  3. Finding g-forces
    • An exciting roller coaster will make you weightless and in the next instant squish you into your seat. A really bad roller coaster squishes you until you pass out. This is awesomely known as G-LOC (G-force Induced Loss of Consciousness). With the proper training and gear, fighter pilots can make it to about 9g's before G-LOC. Mere mortals like myself usually experience G-LOC between 4 and 6g's.

      As I mentioned, I set the limit for pipe insulation roller coasters at 30g's simply because it allowed more creative and exciting coaster designs. While this would kill most humans, it turns out marbles have a very high tolerance before reaching G-LOC.

      To find the g-forces being pulled on corners, loops, or hills you just need to find the radial acceleration (keeping in mind that 1g = 9.8 m/s^2):

    Pipe Insulation Roller Coaster construction underway

    Raise the stakes

    Students become fiercely proud of their roller coasters. They'll name them. Brag about them. Drag their friends in during lunch to show them off. Seeing this, I had students show off their creations to any teachers, parents, or administrators that I was able to cajole into stopping by for the official testing of the coasters. I even made up a fun little rubric (.doc file) for any observers to fill out for each coaster. This introduces some level of competition into the project, which gives me pause- though from day one students generally start some friendly smack talk about how their coaster is akin to the Millenium Force while all other coasters are more like the Woodstock Express. The students love to show off their coasters, and it seems the people being shown enjoy the experience as well.

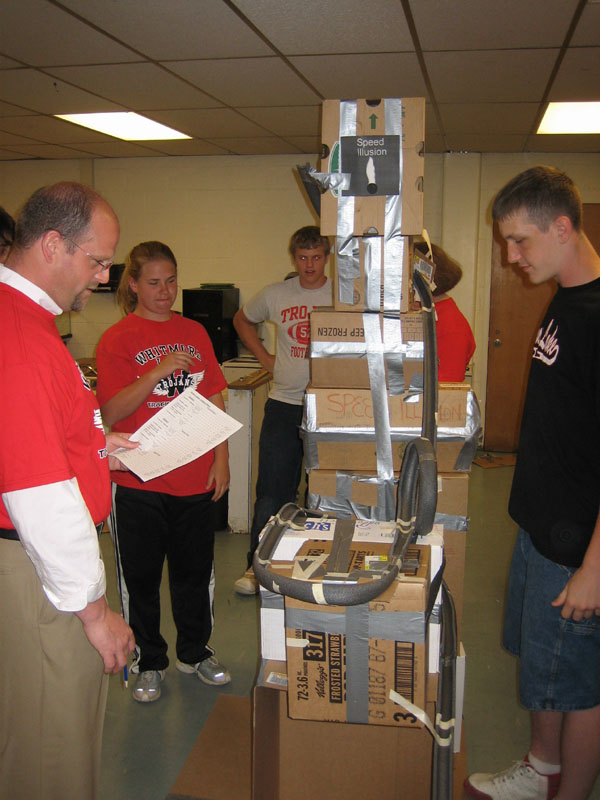
    Coaster judging in progress.
    Coaster judging in progress.

    Assessment

    Assessment is massively important. However, this post is already long. The exciting conclusion of this post will feature the assessment piece in: Part 2: Pipe Insulation Roller Coaster Assessment.

    The Pipe Insulation Roller Coaster Series

    1. Pipe Insulation Roller Coasters and Rolling Friction
    2. Pipe Insulation Roller Coasters
    3. Pipe Insulation Roller Coaster Assessment


    1. The first day we played with pipe insulation in class I had students use some marble-sized steel balls. Unfortunately because the steel balls are so much heavier and the pipe insulation is spongy and flexible, there was just too much friction. When we switched to marbles the next day everything worked like a charm. []
    2. Most groups typically use more than one roll of duct tape. My first couple years I bought the colored duct tape and gave each group a different color. That was a nice touch, but also a bit more expensive than using the standard silver. Whatever you decide, I highly recommend avoiding the cut-rate duct tape. The cheap stuff just didn't stick as well which caused students to waste a lot of time fixing places where the duct tape fell and in the end used a lot more duct tape. []
    3. I had an arrangement with our school's kitchen manager to set broken down boxes aside for me for a few weeks before we started the project. If that's not an option, I've also found if you talk to a manager of a local grocery store they're usually more than willing to donate boxes. []
    4. I made it a requirement for groups to start by building a cardboard rectangle with the maximum dimensions. This served two functions: (1) It made it easy for the groups to see what space they had to work with, and (2) it allows the roller coasters to be moved around a little by sliding them across the floor. []
    5. Originally I wanted students to keep g-forces below 10. Very quickly it became apparent that under 10g's was overly restrictive and I upped it to 30g's. That's not really safe for living creatures, but it would certainly make it more "exciting." []